Embroidery On Black
How to embroider on a black fabric?
This is a question that we receive frequently. For some reason, it feels more intimidating to embroider on a darker background. Thankfully, the answer is quite straightforward: You use the same embroidery stitches as you would on a white fabric!
The only thing to pay attention to is your choice of colours. With a dark fabric your chosen colour will appear differently than it would on white.
In other words, embroidery on black tends to make the stitches “pop” more. Especially if you choose to use clear colours, which will create a high level of contrast. For maximum effect (especially if you work on a piece with a great deal of contours), we recommend to use white. It doesn’t only make the lines pop, but also generates a modern and luxurious look.

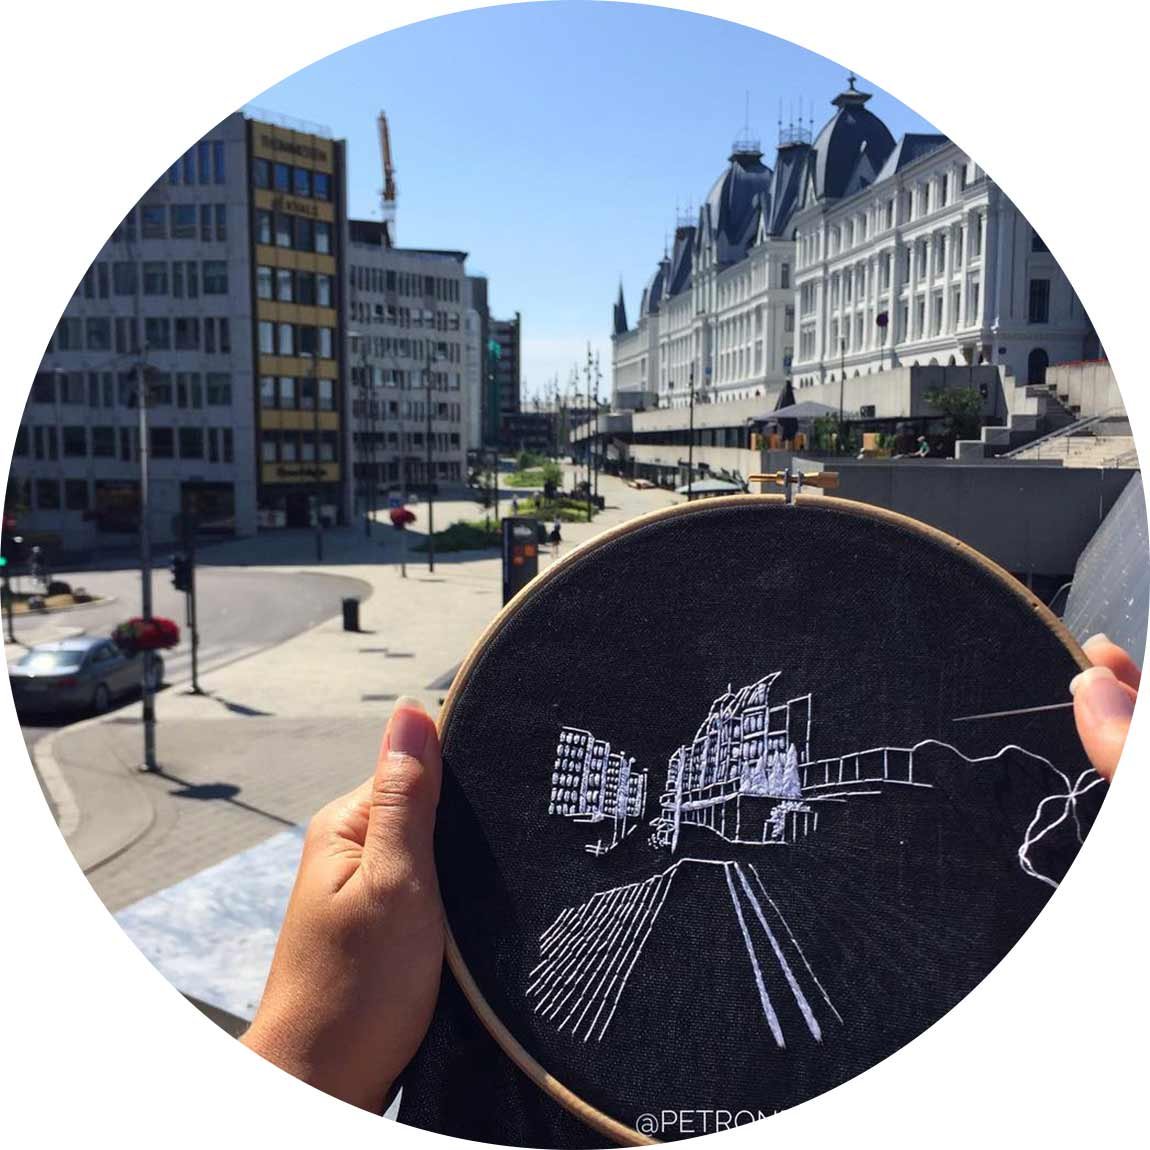
Hôtel de Ville
One of my white on black architectural embroidery pieces of Hôtel de Ville, Paris – the effect is just stunning! Click the image to get the pattern and try it out yourself too!
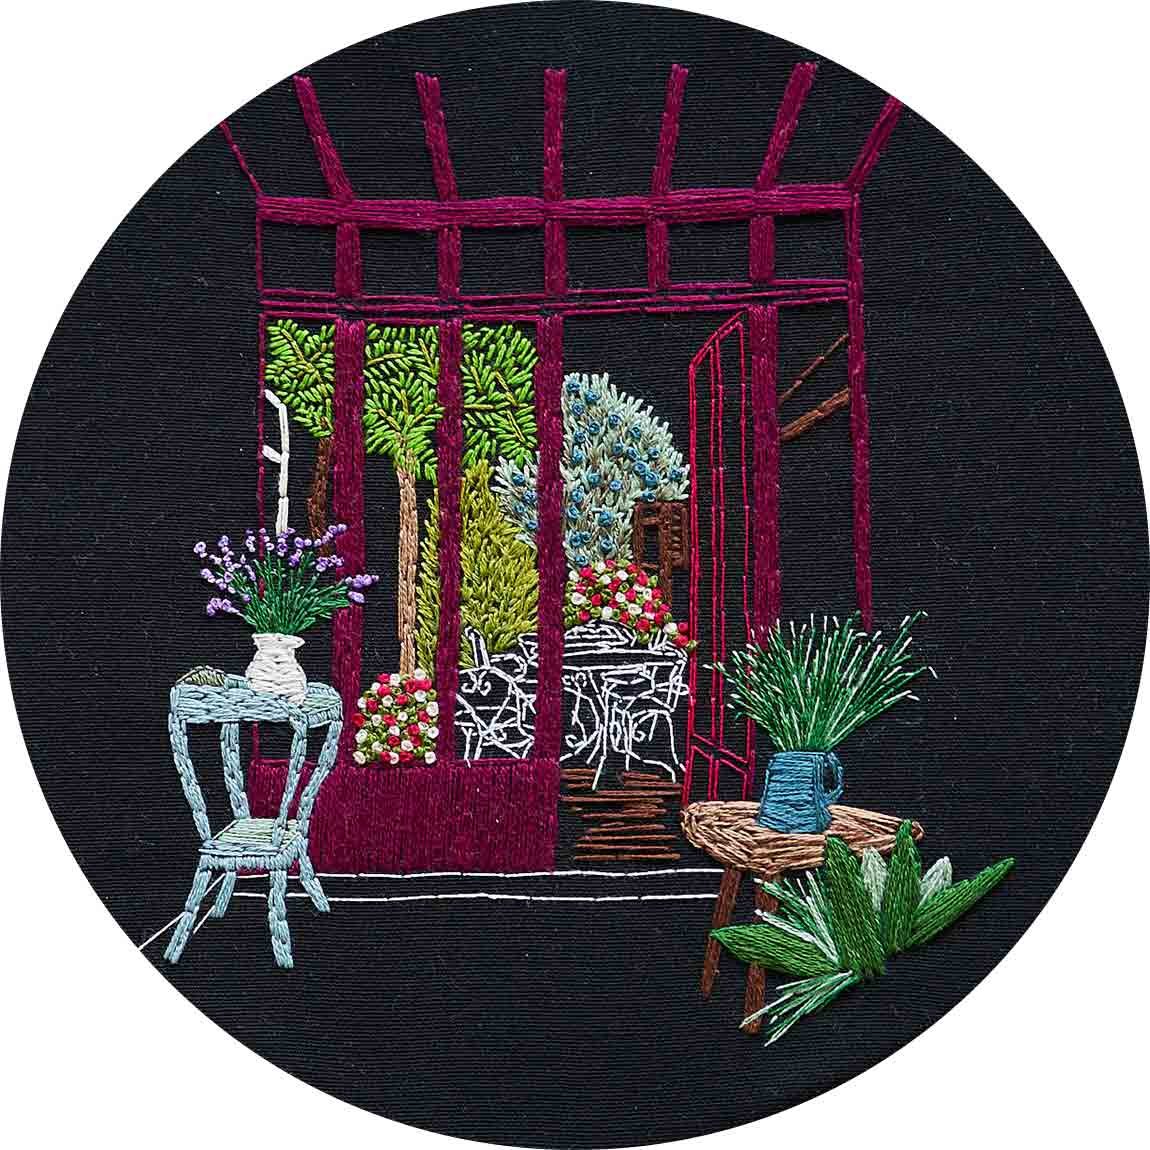
Parisian Courtyard embroidery on black
The example of Hôtel de Ville above shows the effect of white on black. But another example that better shows the impact of various colours on black is Charles’ design of a Parisian Courtyard.

Embroidery example on black fabric
On this embroidery design you can clearly see the effect of both sombre and clear colours and how it contributed to the perception of foreground, mid-ground and background. The distinctive Bordeaux, serves as a strong division between the light and “poppy” front and the bright courtyard behind the glass doors.
If you wish to get a better and deeper understanding for what is meant with foreground, mid-ground and background we’ve got a full module on this in our “How to create your own embroidery design” Masterclass.
Colours play a key role in distinguishing between the different “spaces” and to enhance the depth in your embroidery work. Thus, this Parisian Courtyard pattern is the perfect place to start to get your mind around it.

Embroidery process example
Here’s an example on me embroidering the City Hall of Paris on black fabric.
Let’s look closer at the embroidery process…
1) How to transfer to a black fabric?
Before you can begin to embroider you have to transfer the design onto the fabric. We primarily promote the carbon paper for transfer as we love the authenticity involved. Furthermore, carbon paper allows for “on-top” transfer, which means that you’re not dependent on a see through fabric.
Instead, you can use a more rigid and thicker cotton canvas that will give you both stability and a more embroidered fine art look. If you choose to use the carbon paper technique, you will need to use a white carbon paper. If you’re around the Paris area you can find it at Rougier & Plé, alternatively online with our favourite material supplier CloudCraft who also offers great cotton fabrics for hand embroidery.
2) Decide the effect your desire
Why do I write decide the effect you desire and not which embroidery techniques to use? Because it’s the end result that is the must important and not the name of the technique.
However, to facilitate the learning and explanation phase we’ve identified the key 7 stitches that we use for all our designs. Yep, you read that correct – we only use a maximum of 7! You can check them out in this article.
For the Parisian Courtyard design for example, you will have a fun mix of techniques including: back stitch, satin stitch, French knot, split stitch and straight stitch!

Begin with the back stitch contours of the chairs and table using a single stranded white thread. It’s always recommended to begin with the contour work as it will give you a better overview of your process.
To begin with contours is especially important when you embroider on a black background, as the white carbon transfer may slowly fade with time. Furthermore, it can be trickier to see the white lines if you don’t have good light to embroider. We therefore strongly recommend to only embroider on black fabric when you’re able to stitch in daylight.
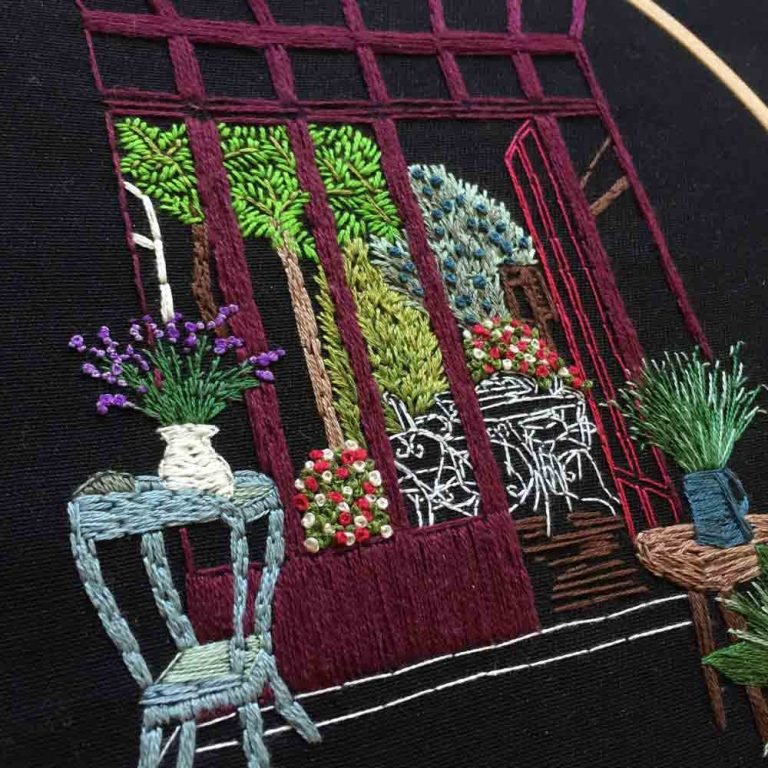
On this close up image you can, among other things, see how Charles has embroidered backstitched lines closely together to follow the shape of the table. It just looks advanced as a result of the thinner thread (two strands).
Let’s overlap, combine and be conscious of the direction of your stitches
In addition to close up view of the white back stitches above, you also get a good overview of the combination of stitches used. For example, the flowers are stitched with the French Knot technique. Depending on the number of strands, you’re able to variate the size and impression of different flowers.
At the blue tree in the top right corner you can even see how Charles has added knotted stitches on top of straight stitches leaves. This is to create texture and life with both colour and overlapping techniques.
On both the image above and the second close-up photo to the right, you see how the leaves of the trees are represented with a straight stitch each, whereas the greenery in the potted plants are embroidered with aligned back stitches.
There are no limits as to how you can combine and overlap techniques. Rather, we urge you to liberate yourself from labels and restrictions and think of the flow of the image.
To give another example, the lovely soft shape of the table legs at the bottom left has been embroidered with closely aligned back stitched lines. The contrast between the horizontally stitched table surface and the smooth vertical legs, enhances the realism of the table.

A close-up image from the right, where you for example can see satin stitches of various length to capture the greenery, as well as single-stranded back stitch lines for the potted plant.
Concentrate on the overall impression
On the close-up images you might have noticed that the covered surfaces aren’t completely filled out. This creates a more fine art and impressionist result. In the crafting side of hand embroidery, teachers often encourage to fill surfaces will stitchery.
However, if you wish to transition into a more impressionist and artistic hand embroidery, we recommend to reduce the number of strands and fill the surfaces more “freely”.
Excited to try embroidery on black after reading this?
We’ve got you! The Parisian Courtyard embroidery on black is up for grabs right here. Thus be sure to check it out and get started stitching today. This hand embroidery design isn’t just a pleasure to make, but it will also fit into any home as a beautiful decoration.
You can use the hoop for framing, or stretch it onto a canvas frame. Or why not cut it out and turn it into a one of a kind embroidery patch? Maybe for the back of your jacket, a pillow or even a bag! The possibilities with modern hand embroidery are endless, which is yet another reason to simply love this art medium.