
Step By Step Guide On How I Made One Of My Recent Embroidery Designs By Free Hand
Free hand embroidery and how to make your own embroidery designs are two of my favourite things. Yet if you’re new to modern hand embroidery as an art form, it can feel overwhelming at first. Therefore, I want to invite you into my process of making an embroidery design from scratch with this step by step guide.
My mission is to make you curious about the process and hopefully you’ll dare to give it a go as well.
Before we dive in, you might want to have a look at the article I wrote last week. It gives you 3 of my top insider tips to successfully embroider your own designs by free hand. Additionally, you’ll also get the two keys to creativity, which I hope will help you to feel more encouraged to start experimenting.
Step 1: Stitch your base
The first step when you embroider anything by free hand is to start with a shape. For this design I began with a rectangle, which became the basic shape of a window.
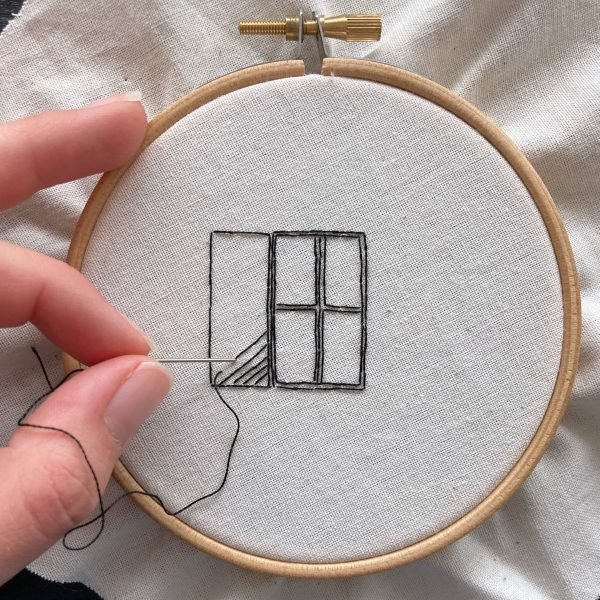
The reason I say to start with a shape (e.g. rectangle), is because it can become many different things. As explained in a recent article, your creativity will start to sparkle as soon as you place your first stitches. The more you advance on the contours of the rectangle, the more your imagination will begin to explore its shape. As a result it will bring you to the next step of your embroidery design.
I used the backstitch technique and a single stranded black dmc floss. Thanks to the single strand, the result looks closer to an ink sketch than an actual embroidery.
Of course, the hoop and fabric reveals that it is indeed embroidered. But there is something I just adore about the thread sketching look.
Perhaps it’s because sketching is such a big part of exploring your creativity and to practise your observation of the surrounding. Hence, to thread sketch becomes a translation of that same pen and paper practise – but in a more tactile medium… Well, I will have to write a whole separate piece on that later!
Step 2: Give the base it’s character
Now that you have the the first stitches in place, it’s time to take the next step in the process. We already decided in step 1 that the rectangle would turn into a window.
As soon as you have settled on a subject the next step is easier. You will simply begin to brainstorm complementary elements to (in this case) windows. With a husband from France I have a weak spot for charming window shutters. Hence, you can see that I decided to stitch some shutters…

To add additional character to the design, I made one of the shutters half open. This is a simple trick to add some more depth to an image. By making the outer side of the shutter longer than the inner side, you create the perception that the shutter is angled towards you. The latter is enhanced by a visible line to also emphasize the thickness of the shutter.
Furthermore, I also stitched diagonal backstitch lines to create the illusion of them being made in wood. It also adds a more eye-catching texture. Last but not least, the little mini heart at the top adds a charming and romantic touch.
Step 3: Provide context
Step one and two have dealt with the subject of the design: the window. For this step we will continue by providing context to the window. In order for a window to exist, there unavoidably has to be some kind of wall. Technically, you could claim that there’s already a wall without stitching anything extra.
The blank space around the window could signify a white painted smooth wall. If you’d choose to keep the wall “empty”, you can still point to its presence by embroidering for example some plants hanging. However, for the purpose of this free hand design, it’s more fun and graphically interesting to think of various representations of a wall.

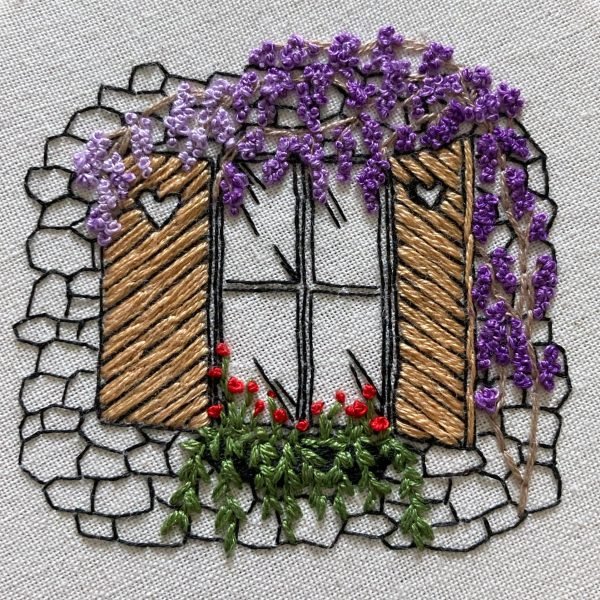
Here you can see that I chose to go for a textured stone wall. I still use the single-stranded backstitch technique to stitch the contours of each stone. Personally I love history, which makes old architectural stone houses a long time favourite. I always wondered how the builders were able to make such a neat wall with varying sizes of stones…
Anyhow, to add a hint of age, I stitched the stones in a seemingly random manner with regards to their size. Considering the free hand process, it is also easier and more relaxing to not have to follow an exact schema. Nevertheless, you can of course transfer all the stones from the pattern if you find this to be easier.
The pattern is available as a bonus in the Monthly pattern program throughout the month of June.
Step 4: Make the design pop with a touch of color
Colorful embroidery floss is a perfect way to bring life to a design. An easy trick to make the impression of various nuances, is to use multicolored floss. For this wisteria plant I chose to use the DMC52, which is a multicolored purple embroidery thread.
However, before stitching the wisteria, I had to add the flower stem. This was done with a two-stranded backstitch. It’s always recommended to stitch the stem before the flowers. The reason is that the stem will help to guide you where to place the florals. Furthermore, in nature the stem grows before the flowers arrive, which just makes this order the most logical!

In addition to the purple wisteria, I also decided to fill in the shutters. It simply felt a bit too “empty” without any color in this area. Thanks to embroidering the contours first, you can get a better visual overview and make more confident decisions on how to enhance the composition (with for example color).
Step 5: Make the final details
Most of the embroidery design is ready at this point! Now it’s just up to the final details before calling it complete.
As you have probably noticed throughout this step by step guide, to make your own embroidery design is a process of layers. You start with the base, which is what you have in the background, whereafter you work your way “forward” and “sideways”.
Thanks to this step by step procedure I could see that there was something missing in the flower pot underneath the window. Ones again, I began by stitching the stem of the greenery as well as the red flowers. After the stem comes the leaves as well as the French knots, which serves as mini florals. And voilà!
I hope you enjoyed reading more about how I made this embroidery design from scratch. If you wish to embroider it as well, you can find the pattern throughout the month of June in our pattern program.
Thank you for reading along!
Ps. If you enjoyed this, you may also like to read about the 5 misconceptions everyone should know about making your own embroidery designs.